Tutorial cdiff
To learn more about cdiff see the commands page.
Step 1 : Tutorial Setup
Create a folder on c:\ drive called "c:\smcl". Download the following image
"stone.jpg" and place it in the folder.
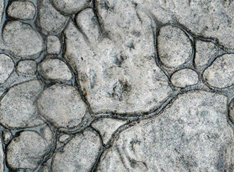
(Original texture by Querida Lindsey. Made tileable by us.)
Next open a text editor and save the blank file as "tutorial_cdiff.bat" in the smcl folder. It is important that the file have the .bat extension so Windows® recognizes it as a batch script.
Step 2 : Write the Batch Script
We are going to use a Windows® batch script to send command lines to ShaderMap CL. To learn more about Windows®
batch scripts see
Batch Files (Scripts) in Windows.
Open the file "c:\smcl\tutorial_cdiff.bat" in the text editor. Copy & paste the following three lines:
CD "C:\Program Files\ShaderMap CL"
START /WAIT shadermap.exe cdiff "c:\smcl\stone.jpg" -disp (60,100,12,xy) -norm (100,200,xy,0) -ambo (100,10,10,35,25,0,xy) -spec (100,-50,52,xy) -v
Now save the file.
START /WAIT shadermap.exe cdiff "c:\smcl\stone.jpg" -disp (60,100,12,xy) -norm (100,200,xy,0) -ambo (100,10,10,35,25,0,xy) -spec (100,-50,52,xy) -v
Step 3 : Understanding the Script
The first line of the script uses the Windows® command CD. CD sets the working directory of the script. In this
case we are setting the working directory to the ShaderMap CL application directory.
The second line uses the Windows® command START. START runs an application with command lines. You see it starts shadermap.exe with the cdiff command followed by the filepath of our source image, stone.jpg. Next we have the command arguments. Each argument is discussed below.
-disp (60,100,12,xy)
This tells cdiff to create a displacement map from the diffuse map. As mentioned on the commands page
it is wise to include this argument when converting from diffuse maps because all other maps are created from the
displacement map. By controlling the parameters of the displacement argument you can have greater control
over the other maps created.
The first parameter value is for displacement smoothing. It is set to 60. The next value is for level and is maximized at 100. The third value is for post blurring and is set to 12. The final value tells cdiff that the source image is tileable along the x and y directions.
-norm (100,200,xy,0)
The -norm argument tells cdiff to create a normal map from the displacement map. The first value is for level (which will
pre-level the displacement before creating a normal map) and is set to 100. The second value is for normal intensity and is set to 200. The
third value tells cdiff that the source image is tileable. The last value controls inversion of normal components. It is set
to 0 so neither x or y are flipped during creation.
-ambo (100,10,10,35,25,0,xy)
The -ambo argument tells cdiff to create an ambient occlusion map from the displacement. The first value controls the
brightness of the base pixel and is maximized at 100 (white). The second value tells cdiff to use 10 samples (80
surrounding pixels) when rendering the ambient occlusion map. The third value tells cdiff to ignore pixels with only
a 10% height displacement for every pixel. The fourth value sets the shadow intensity to 35. The fifth value controls
the amount of post blur and is set to 25. The sixth value is set to 0 so cdiff does not normalize the final ambient
occlusion map. The last value says the source image is tileable.
-spec (100,-50,52,xy)
The -spec argument creates a specular map from the displacement. The first argument value controls pre leveling of
the displacement and is 100. The second value is the brightness and is set to -50 for a dark map. The third value
controls contrast and is 52. The last value says the source image is tileable.
The -v argument tells cdiff to show progress in the console window.
For a review of all values see the arguments page.
Step 4 : Run the Script
Next open the smcl folder and double click on the batch file "tutorial_cdiff.bat". If all goes well you
should see a black console window as ShaderMap CL renders the maps.
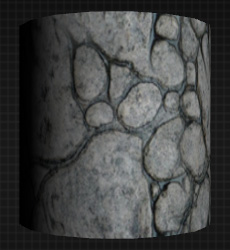
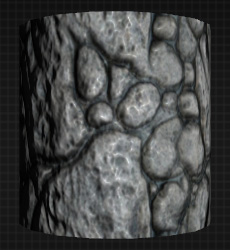
Example renderings using created maps. First is Diff only the second is all maps applied using standard bump mapping.
Step 5 : View Your Files
The created maps are always placed in the same directory as the source image. So you should now see the following
new files in the smcl folder: stone_DISP.bmp, stone_NORM.tga, stone_AMBO.bmp, and stone_SPEC.bmp.
Things to Try
Go back into your script and make some parameter changes before running the script again. See how making
changes to displacement parameter values affects all other maps created. Try inverting the displacement image by
settings its level value to -100. Increase or decrease the intensity of the normal maps. Try darkening the
ambient occlusion shadows. Have fun.