Below is a quick start guide that will give you a basic understanding of how to use ShaderMap to generate Maps from other Maps.
Follow each step and you will gain a better understanding of how to use ShaderMap.
Before starting you should save
this JPEG image to your
hard drive. Place it on your Desktop so it is easy to locate.
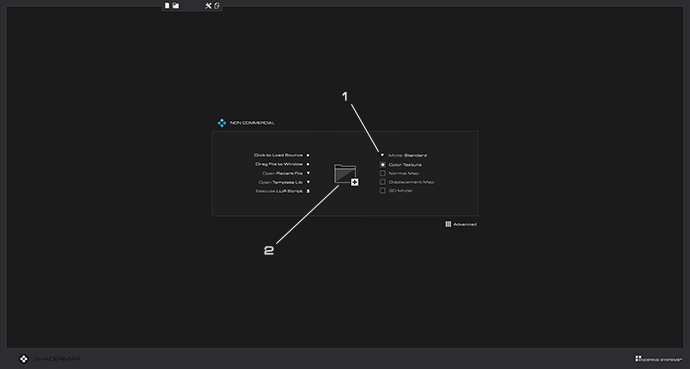
Step A - Open ShaderMap by double clicking the ShaderMap icon. You will see the ShaderMap Start page as shown below.
Step B - Ensure that the (1) STANDARD MODE is selected and COLOR TEXTURE checkbox is checked then click the (2) center folder icon. This will open a file dialog. Navigate to
the file "floor_seamless.jpg" that you had saved to your Desktop and open it.
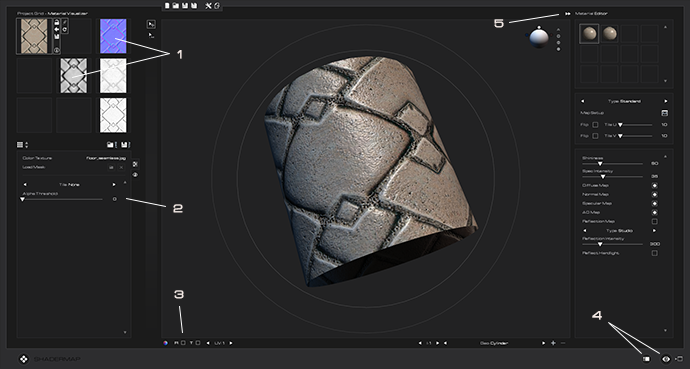
ShaderMap automatically sets up a project with maps generated from the color texture. It then displays the Material Visualizer with
a material (created from the generated maps) applied to a 3D cylinder.
- Click any map to select it, double-click it to show it in the Map Preview.
- The selected map properties will be displayed under the Project Grid.
- Toggle Auto Rotate by setting the R checkbox located at the bottom left of the Visualizer window.
- Switch between the Visualizer and the Map Preview by clicking on the buttons at the bottom right of the application window.
- Toggle the Material Editor by pressing the arrow on the upper right of the Visualizer window.
 Step C
 - Select the Displacement Map, it is the one located in the center of the Project Grid. You will see a line connected from it to the
original Source Color Map. This interface shows the map's input map.
Step D - Select the Normal Map, it is the purple-blue one located in the upper right of the Project Grid. You will see a line connected from it to the
Displacement Map. Move your mouse over the displacement map where the line is connected to it until you see a double circle appear. Click and drag it to the
center of another map. The normal map will be regenerated as you have just changed its input. You can drag it to any map that is not a child of itself.
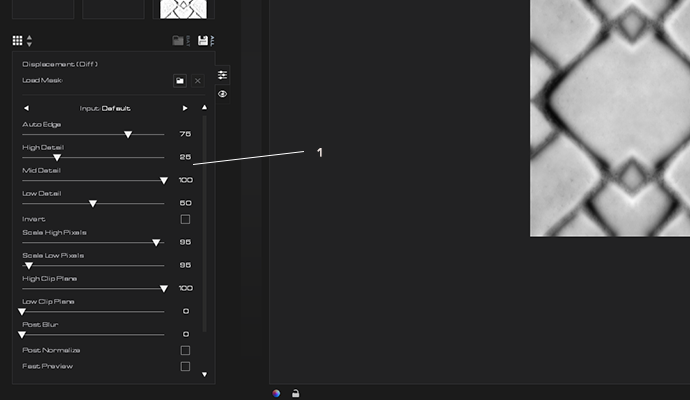
Step E - Drag the Normal Map's input back to the Displacement Map, then click on the Displacement Map to select it. Set the Displacement Map's
properties as you see below (1). ShaderMap will first modify the Displacement Map with the new settings then regenerate the child maps that use it as an input.
 Step F
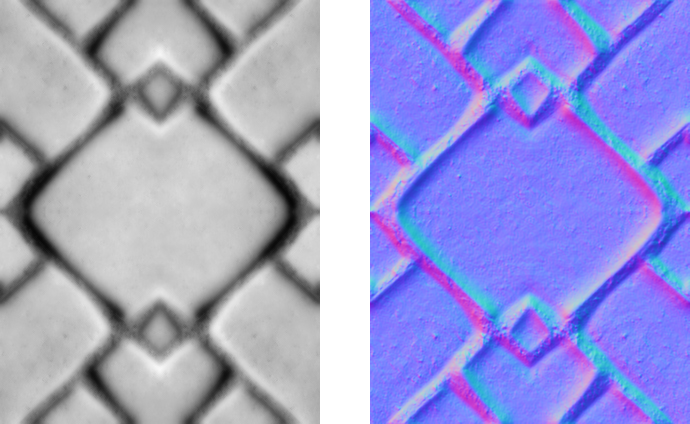
 - Click on the Normal Map and set its Intensity property to 200. You should now have a Displacement and Normal map that look like this.
 Step G
 - Click the show Material Visualizer button at the bottom right of the application.

Next show the Material Editor (if it is not already out) by clicking the show Material Editor arrow button at the top right of the Visualizer window.

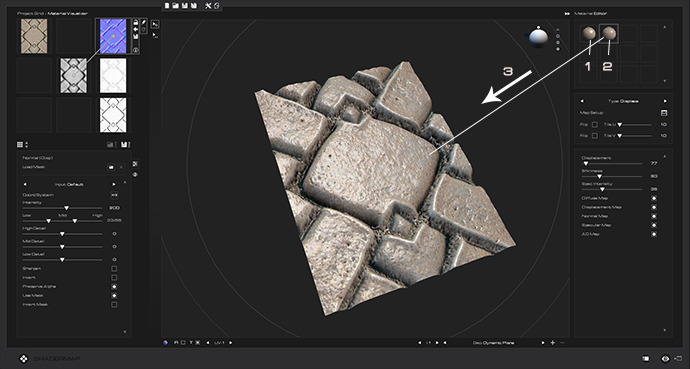
You will see two materials (if your video hardware supports it). The first is the Standard Map (1). It is a basic Tangent Space Normal bump shader. The second
material is a Displacement shader (2). Click to select the Displacement material then drag-and-drop it onto the Visualizer geometry (3). The material is now
displayed on the 3D model. You can drag-and-drop the Standard material too. Apply each one and spend some time playing with each material's properties.
 Step H
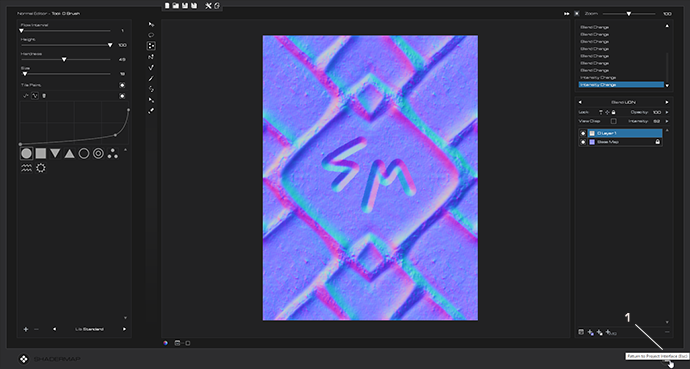
 - Select the Normal Map in the Project Grid. You should see a series of buttons to the right of the selected map.

Clicking the Edit button will send the selected Normal Map to the Normal Editor. Learn more about how to use the Normal Editor
here.
When you are done editing the Normal Map, click the Maps button (1) on the bottom right of the application and you will be returned to the Main Interface.
 Step I
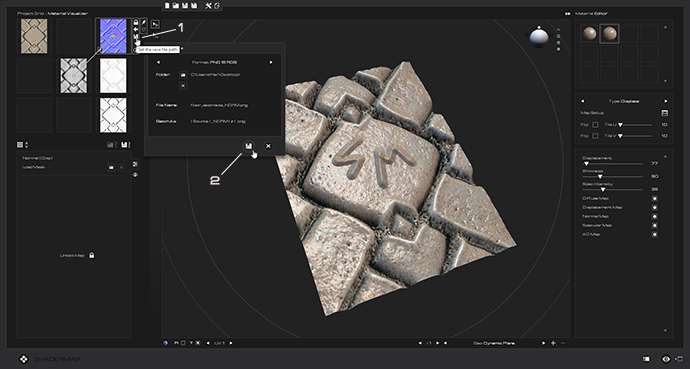
 - It's time to save the Normal Map to file. Make sure the Normal Map is selected and click the File icon (1) button next to it.
A Windows file dialog will open and you can choose a file name and file type for the saved image. If you do not select a file type a default one will be chosen for you.
After you select Save in the file dialog the ShaderMap "Save Map to File" dialog will open. Click the Save File button (2) at the bottom right of the dialog to save the map
to file. Now anytime you want to save that map to file, just press the file icon next to the map and the ShaderMap "Save Map to File" dialog will open. You can change the
file name from there and also the file type. You can also hit the Save All Maps button (above Node Properties) and any map that has been setup for export will be resaved.
That concludes the Quick Start Map Generation tutorial. Keep in mind you can repeat all of the steps with the other two default source map types (Displacement and Normal).
At the Start Screen select the appropriate checkbox. Different map types will be generated for each of the default source maps.